
How do I organize my RLV folder and RLV wardrobe so others can dress me easily?
To let others dress you or put items on you with an OC collar, first tidy the #RLV folder in your inventory, which is your RLV wardrobe. This covers what it is, how to sort it, and a very handy web-based wardrobe tool.
Part 1: What the RLV wardrobe is, and why
What is the RLV folder
The RLV folder is a folder named #RLV at the top level of your inventory (the name must match exactly, including case).
Its job is simple: only things inside it can be seen and worn or removed by RLV devices (such as an OC collar). Anything outside it is out of their reach.
Some reassurance:
- Everything stays in your own inventory. Nothing is taken or copied by anyone else.
- It only lets the collar, relay, or similar devices on you know what is in there, so they can wear or remove things for you, within what you allow.
- Without a
#RLVfolder, nobody can change your outfit or put items on you through RLV.
To learn what RLV itself is, see What is RLV, and do I have to use it?
What the dot and tilde folders are
Once you open #RLV, you may see folders with odd names.
- Names starting with
.(dot): hidden folders. They are still in your inventory but do not show up in an RLV device's list. Good for things you do not want others to browse, such as your own head, body, or everyday base outfit. - Names starting with
~(tilde): usually folders a product created for itself, to store its own parts. For example, our products sometimes put accessories here that need to be worn automatically. Do not delete, rename, or move them, or that product may stop working.
Rule of thumb: dot = hidden by me, tilde = made by a product, leave it alone.
You do not need to manage the auto-created ones. What you organize is everything else: the clothes and items you put in yourself.
What is the RLV wardrobe
"RLV wardrobe" is not an official feature. It is just our name for the part of #RLV that you organize yourself.
You put your usual clothes, accessories, restraints, and collars into folders, one set per folder. Then:
- Your owner or friends can open your wardrobe from an OC collar, see neat outfits, and dress you with one click.
- You can see everything at a glance without digging through your whole inventory.
- Anyone who wants to put an item on you can find it quickly.
On the other hand, if #RLV is a pile of messy folders, whoever opens your wardrobe sees chaos and cannot find anything to put on you. How well your wardrobe is organized decides how well others can play with you.
Part 2: How to organize your RLV wardrobe
The idea in one line: sort into big categories first, then one folder per set, then split a set by part.
Recommended layers
#RLV
├ Body (body, head)
├ OC Collars
└ Outfit
  ├ Accessories
  └ Clothes
    └ Some Dress Black
      ├ lara (Lara version)
      └ legacy (Legacy version)
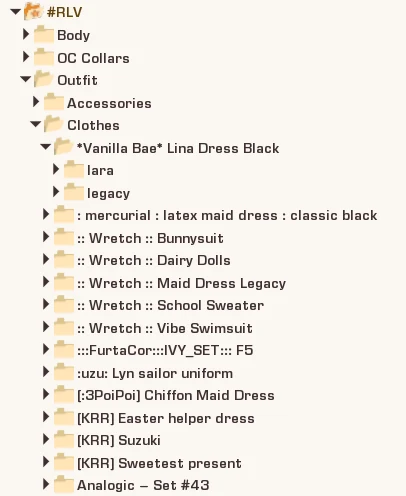
- Top level: big categories. Body, collars, clothes, accessories... sort by your own habits, and do not split too finely.
- Second level: one outfit. One set of clothes or one roleplay look gets one folder, with a name you can recognise at a glance.
- Third level: parts or body versions. If a set has many pieces (top, pants, shoes...), or versions for different bodies (like Lara and Legacy), split into subfolders accordingly.
What my own #RLV looks like (for reference)
Here is mine. It is not a standard answer, and mine is a bit messy too, so treat it as just an example.
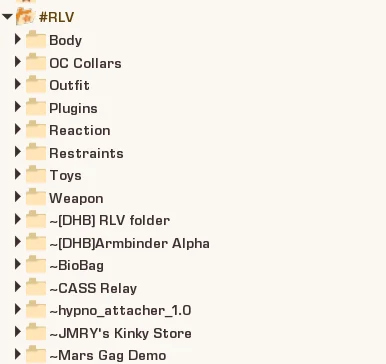
- At the top are my own categories:
Body,OC Collars,Outfit,Plugins,Reaction,Restraints,Toys,Weapon. - The
~folders below are the ones products created for themselves, as described earlier. I leave them alone.
The one key point: do sort into categories. How exactly is up to your own habits, as long as you can find things and others can understand it.
Put in links, not the originals
When you add things to the wardrobe, we recommend: always put in links, never the original items. Keep the originals somewhere else in your inventory, in a place you choose.
Why? Say you have a doll outfit and a K9 outfit, and both use the same ball gag.
- If each set holds its own copy of the gag, you have two copies, and changing the gag or its settings means updating both. It is easy to miss one.
- If both sets hold a link to the same gag, the two sets share one original, and one change updates everything.
Links also keep your inventory cleaner.
Another benefit of links: share one RLV Activator
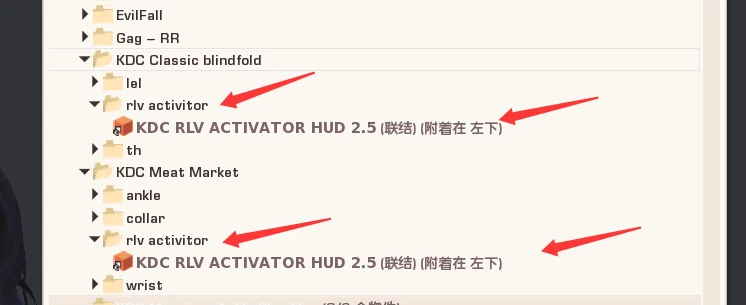
Some stores include an RLV switch (Activator) with their RLV items. For example, KDC items come with an RLV ACTIVATOR HUD, and you have to wear it for the item's RLV features to work.
If you own several KDC RLV items and each needs its own Activator, you run out of attachment slots fast. Use the link approach above:
- In each KDC item's folder, make a folder named
rlv activator. - Put in a link to the same Activator in each one.
Because they are all links pointing to one original, wearing several KDC RLV items at once only puts on a single Activator. No pile of slots used up, and the RLV features still work.
One item per folder (or one set meant to be worn together)
Do not copy a whole purchased package into a wardrobe folder. Manuals, notecards, and loose parts you will never wear should all stay out. Only put in the one thing you want to wear, and only a link to it.
If a folder holds several things, one click from someone wears everything inside at once. So:
- Only things that are meant to be worn together go in the same folder, whether one item or a whole set.
- Things that do not have to go together belong in separate folders. For example, with a gag and blindfold set, do not put both in one folder: one folder for the gag, one for the blindfold. Want both? Click twice. Only want the gag? You will not end up wearing an extra blindfold.
This matters because attachment slots are very precious in this game. Every unnecessary item you put on wastes a slot.
A few tips
- Short, recognisable names: others see your folder names on collar menu buttons, and long names get cut off.
- No commas in folder names: they break the list.
- Do not cram in things you rarely wear: keep only what you wear often and are happy for others to dress you in.
What if a set has several body versions
The *Vanilla Bae* Lina Dress Black in the screenshot above is an example: inside the folder named after the outfit, there are subfolders per body, such as lara and legacy (Reborn and others work the same way).
When someone opens your wardrobe from the collar and goes into that outfit, they open the subfolder that matches your body and wear it from there.
A naming tip for subfolders
If an outfit is split by both body and part (blouse, dress, sleeves...), name the subfolders as body, a dash, then part. For example legacy-blouse, reborn-dress, reborn-sleeves.
That keeps each body's folders together, so you can spot the ones you need at a glance.
Also, give the HUD its own folder (such as hud) instead of mixing it in with the clothes.
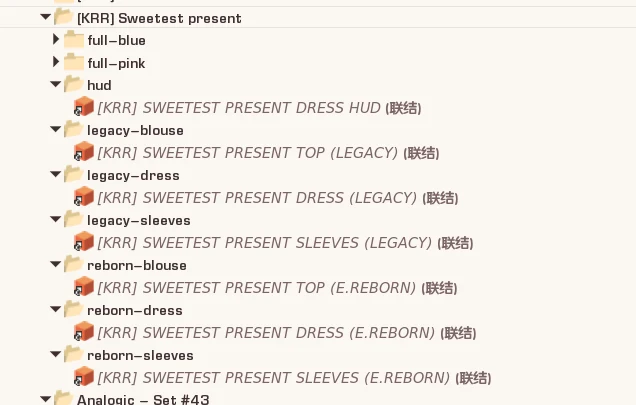
(Every folder in the picture holds links, which is the approach described above.)
My own workflow
My approach: originals live outside #RLV, and #RLV only holds links. Every time I buy something new, I do this:
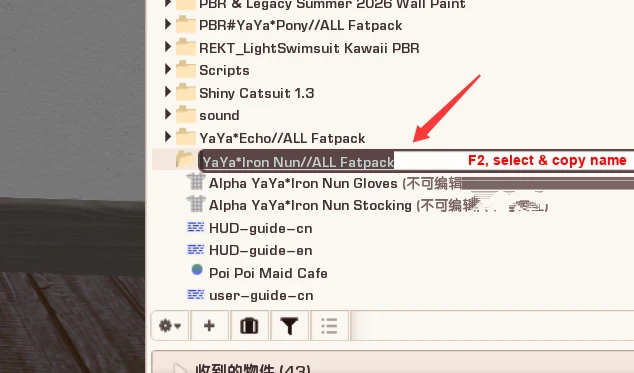
Copy the product name: after unpacking something new, select the product folder, press F2 (Windows) to rename it, select all, and copy the name.
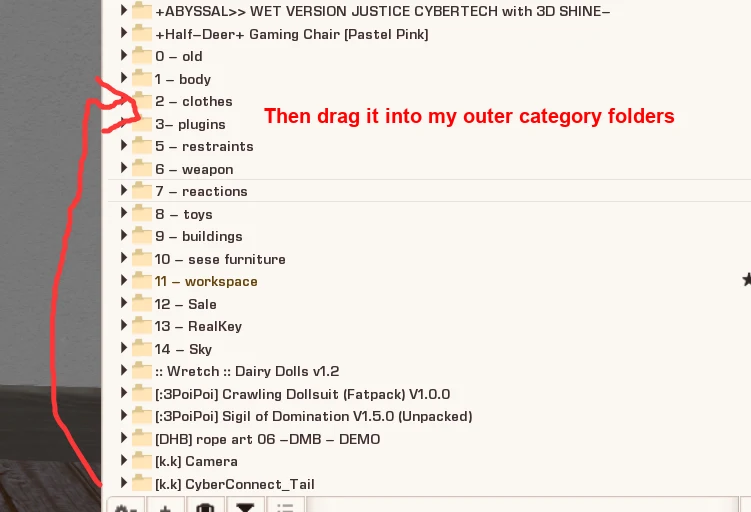
File the original first: outside the #RLV folder I keep a few organizing folders, such as clothes only, restraints only, plugins only. Drag the whole product folder into the matching one.
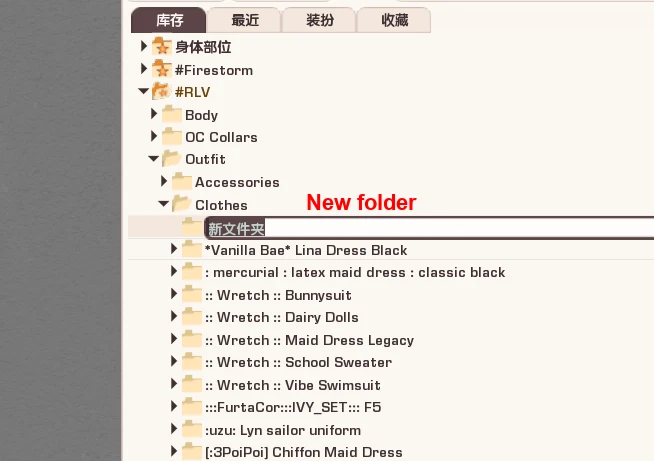
Make a matching folder in #RLV: go to the matching category in #RLV, create a new folder, and paste the name you copied.
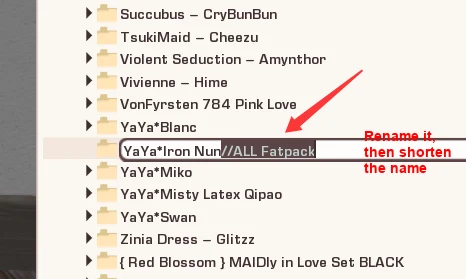
Clean up the name: shorten it and remove punctuation. Ideally keep only English letters, numbers, and dashes.
Make subfolders: inside it, make one subfolder per body, such as
rebornandlegacy, plus ahudfolder if there is a HUD.
Paste as links: go back to the original product folder, copy the items you want, then in the matching subfolder in #RLV right-click and choose Paste as Link. Versions for different bodies go into their own subfolders.
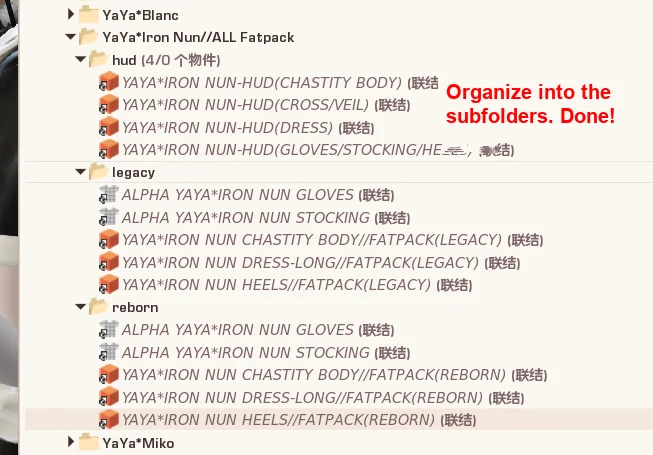
Do it once, and it stays convenient from then on.
Part 3: Recommended tool, the (CTS) Wardrobe web wardrobe
Once your folders are tidy, there is one more thing that makes it much nicer to use: (CTS) Wardrobe.
It is a web-based RLV wardrobe, used by a lot of RLV players. Think of it as an upgraded version of the OC wardrobe (folder system): more convenient to use, but also more troublesome to set up.
If you want to play seriously, it is basically a must later on. But if you are new, the OC wardrobe is enough to start with. Once you are comfortable with how the RLV folder works, upgrade to CTS.
- Wear and remove from a web page: one click to put on or take off (needs an RLV-capable viewer, such as Firestorm).
- Pictures: see what an outfit looks like at a glance, without putting it on or waiting for thumbnails to rez. You can also import product pictures straight from the Marketplace. (The OC wardrobe has no pictures, only folder names.)
- Tags: find "all black ones" or "all long gowns" with one click.
- Quick lock and other small features.
- Share links: share a link with different permission levels so others can control your wardrobe.
It works from your #RLV folder, so the organizing above still matters. A separate FAQ will cover the setup.
L$699 on the Marketplace: (CTS) Wardrobe.
Note: it is a tool for organizing and quickly wearing outfits, not for storing items. You still need to keep your items in your inventory yourself.
With tidy folders and this tool, it will be much easier for others to play with you.